English
 Français
 Español
 Português
 عربى
 日本語
 한국어
 русский

Closed Surgical Incision Care: Closure Methods, Dressings, and Healing
Content
- 1 What a Closed Incision Really Is
- 2 How Surgeons Close an Incision
- 3 What Normal Healing Looks Like
- 4 Dressing Choices for a Closed Incision
- 5 Day-to-Day Care in the First Two Weeks
- 6 Signs That Need a Call
- 7 Suture and Staple Removal
- 8 Caring for the Scar Once the Incision Is Sealed
- 9 A Note for Buyers Building a Wound Closure Range
A closed surgical incision looks deceptively simple: two wound edges brought together, a line of staples or a neat row of sutures, a dressing on top. Underneath that thin line sits a carefully planned repair, with tissue layers closed in sequence, dead space eliminated and tension spread as evenly as possible across the skin. Knowing what was actually done, and what ordinary healing looks like day by day, makes the wound far easier to look after at home and makes it much easier to spot the moment something needs a professional opinion. This guide walks through the common closure methods, sensible dressing choices, daily care and the warning signs that deserve a phone call rather than another night of watching.
What a Closed Incision Really Is
A closed incision is a wound that has been deliberately brought back into alignment so it can heal by primary intention, meaning the edges knit directly rather than filling in from the bottom. Most operations close in layers: the deep fascia first for strength, then the subcutaneous fat to remove empty space, then the skin itself. The visible scar is therefore only the top of the repair, which explains a few things patients often find puzzling.
It explains, for instance, why a wound can look perfectly tidy while still feeling firm, lumpy or bruised underneath. It also explains why surgeons are cautious about tension. A closure that is pulled too tight, or one placed over a joint that keeps moving, is more likely to spread or separate. And it explains why a collection of blood or serum under the skin, known as a hematoma or seroma, may show up as new swelling and pressure several days after an operation that otherwise went smoothly.
How Surgeons Close an Incision
The method chosen depends on the site, the depth, the amount of tension and how quickly the wound needs to be secure. Most patients meet two or three of these techniques at once, since deep layers are usually closed with absorbable material while the skin gets something removable or self-dissolving.
 Absorbable Surgical Sutures in 45, 60 and 90 cm LengthsView sutures for internal and mucosal closure, with absorbable materials, multiple needle options and 45, 60 or 90 cm thread lengths.View Product →
- Non-absorbable sutures hold the skin edges with fine, strong thread and are removed once the wound has gained enough strength.
- Absorbable sutures dissolve over days to weeks and are common in deeper layers, in children, and in areas where a removal visit would be awkward.
- Surgical staples close long lines quickly and are widely used on the scalp, trunk and limbs.
- Tissue adhesive seals low-tension cuts and small incisions into a flexible film that sloughs off on its own.
- Adhesive strips support the surface after stitches come out or reinforce a closure under very little tension.
| Closure method | Where it is usually chosen | Typical removal or follow-up |
|---|---|---|
| Non-absorbable sutures | Face, hands and other sites needing fine control | Around 5 to 14 days, depending on site |
| Absorbable sutures | Deep layers, paediatric skin, some mucosal sites | Dissolve over weeks, no removal visit |
| Surgical staples | Scalp, trunk and limbs where speed matters | Generally 7 to 14 days |
| Tissue adhesive | Small, low-tension incisions and lacerations | Falls away by itself in about 7 to 10 days |
| Adhesive strips | Surface support after stitch removal | Lift off naturally within roughly a week |
What Normal Healing Looks Like
Textbook healing is rarely as quiet as patients expect, and a little knowledge prevents a lot of unnecessary worry. In the first 48 hours the line may be slightly pink, mildly swollen and tender to touch, with a small amount of clear or blood-tinged fluid at the edges. By day three or four the tenderness usually settles rather than builds, and the surrounding skin becomes less reactive.
Over the following week the edges should look sealed and dry, with any crusting confined to the line itself. The scar often feels firm and slightly raised for several weeks, then softens. Mild itching during that remodelling phase is common and is a sign of healing rather than infection, though itching paired with a spreading rash deserves a look.
Dressing Choices for a Closed Incision
A dressing on a closed incision has three jobs: absorb the small amount of ooze that escapes in the first day or two, protect the line from friction and contamination, and allow the wound to be inspected without being disturbed every few hours. That is a modest brief, and most incisions do well with a simple adhesive dressing that stays put through a shower.
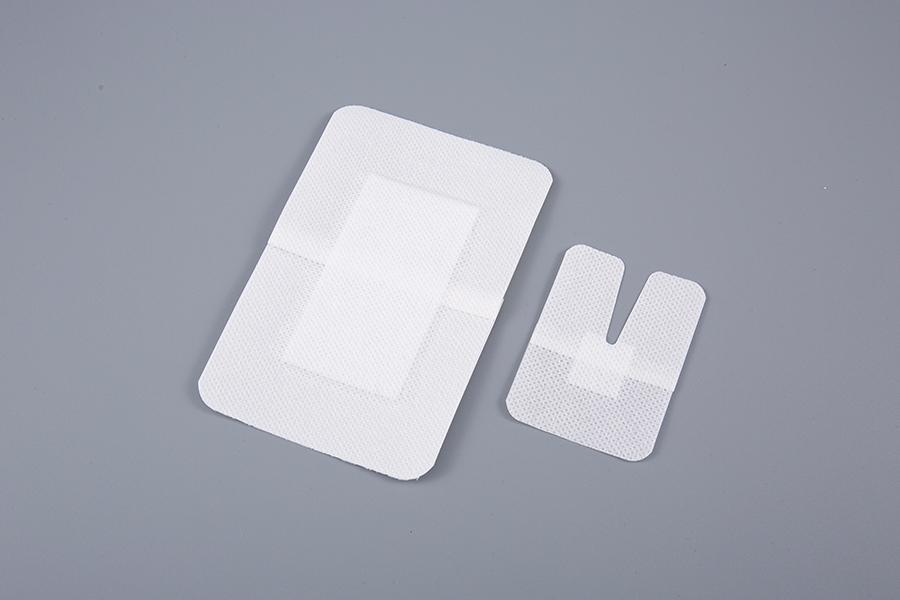 Adhesive Non-Woven Wound Dressings for Comfortable Incision CareExplore sterile adhesive dressings with absorbent pads and non-stick borders for simple incision coverage, easy inspection and painless removal.View Product →
Non-woven adhesive dressings are a practical default because they breathe, conform to awkward contours and lift off without dragging on new tissue. Where a surgeon prefers a dry, covered approach, sterile gauze secured with microporous or paper tape works just as well. Transparent film is useful when the team wants to monitor the line without changing the dressing, and silicone tape suits fragile or already-irritated skin. Whatever is chosen, the dressing should be changed when it becomes wet, soiled or loose, and the skin around it should be checked for tape reaction at the same time.
Day-to-Day Care in the First Two Weeks
Good wound care is mostly unglamorous consistency. The following habits cover most of what matters.
- Wash your hands before and after touching the wound or changing a dressing, every single time.
- Follow the surgical team's guidance on showering; many incisions tolerate a brief shower after 24 to 48 hours, but soaking, baths and swimming should wait until the line is fully sealed.
- Pat the area dry with a clean towel rather than rubbing, and leave the line exposed to air only if you have been told to.
- Skip creams, oils, powders and antiseptics on the incision unless they were specifically recommended, as many slow healing or irritate the skin.
- Support the incision with a flat hand or a small pillow when coughing, laughing or getting out of bed, which reduces the pulling sensation considerably.
- Avoid lifting, straining or repetitive stretching of the area for the period your surgeon advised, since tension is the main enemy of a fresh closure.
- Choose loose clothing over the site to reduce friction, and keep waistbands and straps away from the line.
- Do not pick at crusts or pull at adhesive strips; they will release when the tissue beneath is ready.
Signs That Need a Call
Most closed incisions behave, but a minority develop problems that are far easier to treat early. Contact the surgical team promptly if you notice any of the following.
- Redness that spreads outward from the line rather than fading, especially if it feels hot.
- Thick yellow or green discharge, or any foul odour.
- Pain that increases after the third day instead of easing, or pain that suddenly worsens.
- Fever around 38 C (100.4 F) or above, chills, or a general feeling of being unwell.
- Swelling or a hard lump under the scar that is growing or increasingly tender.
- Any gap opening between the edges, bleeding that does not stop with gentle pressure, or a feeling that the wound is giving way.
- Numbness, cool skin or spreading colour change beyond the incision.
None of these automatically means something serious, but they are all reasons to let a clinician decide rather than wait it out.
Suture and Staple Removal
Removal is quick, usually more comfortable than patients fear, and best left to the team that closed the wound or to a practice nurse. Come to the appointment with clean skin and, if possible, a note of when the closure was performed. Afterwards the line is often supported with adhesive strips for a few days while it gains final strength, and the area should still be treated gently for another week or two.
 Medical Care Suture Removal Kit with Scissors, Gauze and ForcepsA kit for suture extraction that pairs Littauer scissors, a gauze sponge and suture forceps to support controlled, hygienic removal appointments.View Product →
Kits that gather the required instruments and dressings in one sterile pack make this step more consistent, particularly in busy clinics where a nurse may be seeing several patients in a row. The same logic applies to the original closure: a standardised pack reduces the chance that something is forgotten under time pressure.
Caring for the Scar Once the Incision Is Sealed
Once the line is completely closed and dry, gentle scar care can begin. Silicone sheeting or silicone gel is the best-supported non-invasive option and works best started early, though it should not be applied to broken skin. Light massage once the tissue is no longer tender helps soften tethering. Sun protection matters more than most people expect, because young scar tissue pigments readily and a healed line exposed to strong sun can darken for months.
A Note for Buyers Building a Wound Closure Range
For distributors and hospital supply teams, a closed incision touches several product families at once: sutures and needles, skin staples, adhesive strips, primary dressings, fixation tapes, gauze for the first dressing change, and the removal kits used weeks later. Ordering these as a coherent range rather than as isolated line items tends to reduce stock-outs at exactly the wrong moment, and it simplifies training for ward staff who want one recognisable dressing protocol.
Our hospital supply solutions group these categories so that theatres, wards and outpatient clinics can draw from a consistent set of specifications, and we are always glad to talk through pack configurations, sterilisation requirements and labelling before an order is placed.
Every closed incision tells a small story about the surgeon's judgement and the patient's healing, and most of them end uneventfully with a fine pale line and very little drama. A little attention in the first two weeks, a dressing that behaves, and a low threshold for asking a question are usually all it takes to keep that story on track.